PAGE NUMBERING
Page numbers are used to organize a large document for case of reference.
To insert page numbers
- On the insert menu , click page numbers
- In the position box, specify whether to place the page numbers at the top of page (header) or at the bottom of the page (footer)
- In the alignment box – specify whether to align page numbers to the left, center or right of the page
- If you don’t want a number on the first page, clear the show number on the first page check the box then click Ok.
edu.uptymez.com
Note: click on the format button to specify other page number options such as numbering type and font.
HEADER AND FOOTER
Header are lines of text that appear at the top margin every page or selected pages while footer appear at the bottom margin
- On the view menu, click Header and Footer
- To create a header, enter text or graphical object in the header area.
- To create footer , click inside the footer area and enter the text or graphical object
- Click CLOSE on the Header and footer tool bar
edu.uptymez.com
FOOT NOTES AND END NOTES
Footnotes and endnotes are used in large documents to explain, comment or provide reference for text in a document. Footnotes appear at the bottom of the page while endnotes appear at the end of a section or a document.
To insert footnote or endnote.
- On the insert menu, point to reference and then click Footnote. A dialog box is displayed.
- In the location section , click footnotes or endnotes and specify the location of the footnote or endnote
- In the format section, specify the number type start and continuity.
- Click Insert.
edu.uptymez.com
CREATING AND MANIPULATING TABLES
A table is made up of rows and column of cells. It is used to organize and present information in rows and columns
Creating a table
To create a table
- Click where you want to insert the table
- From the table menu , point to Insert and then click table
- In the dialog box , set the number of column and rows
- Specify the auto format option if needed to be
edu.uptymez.com
EDITING AND FORMATING A TABLE
To delete rows or columns
- Select the row
- On the table menu, point to Delete then click Row/column
edu.uptymez.com
To insert rows or columns
- Click the insertion pointer where you want to insert the rows/column
- On the table menu , point to Insert then click Rows/ column
edu.uptymez.com
To merge cells
- Highlight the cells
- On the table menu, click Merge cells.
edu.uptymez.com
To split cells
- Highlight the cells to split
- On table menu, click split cell
- Enter number of rows or columns
edu.uptymez.com
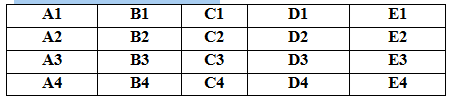
Performing calculations in a table
To calculate numerical values in a table, use cell references. A cell is a cross- section of rows and column. Column is represented by letter, A, B, C. While rows are represented by 1, 2, 3…… as shown below:
To perform calculations in a table
- Place the insertion pointer to where you want the result to be displayed
- On the table menu, click formula
- Type a formula in the formula box e.g. = SUM (A1 . E1)
- Click Ok
edu.uptymez.com
Note: You can select a formula from past function list and use ABOVE and LEFT instead of typing a formula and using cell references respectively
PRINTING A DOCUMENT
Word processing is not complete without producing a hard copy. To print a document
- Preview it by clicking “print preview” on the file menu
- Click print from the file menu
- Select the printer range, number of copies and other options then the dialog box
edu.uptymez.com
Trouble shooting printing related problems
Some of the printing problems you may encounter are
- Lack of two- way communication due to pear installation of the printer software (drives) if the printer is off or not connected
- Paper jams due to use of poor quality of paper or paper folds
- Poor quality print due to poor quality ink or toner used.
edu.uptymez.com
Read the manual that comes with the printer to resolve printing problems\
DUPLEX PRINTING
– This is the process of printing on both sides of the paper.
TYPES OF DUPLEX PRINTING
1) AUTOMATIC DUPLEX PRINTING
2) MANUALLY DUPLEX PRINTING
AUTOMATIC DUPLEX PRINTING
This is the automatic printing on both side of the paper
- Click the Microsoft office button
- Click print properties and then
- Click duplex printing , or two – sided printing
- Click OK.
edu.uptymez.com
MANUAL DUPLEX PRINTING
Manually printing on both side of the paper
PROCEDURES
Odd and even pages
- Click the Microsoft office button and then click print
- On the option select odd page
- Click ok
- After the odd pages are printed , flip the stack of pages over and
edu.uptymez.com
Then in the print list, select even pages
- Click ok
edu.uptymez.com
Using advanced Features of a word processor
Inserting graphical objects
You can insert a graphical object such as a picture a clip art or drawing onto your document.
To insert an object
- On the insert menu, point to picture
- Click on the following options
edu.uptymez.com
- Click Art
- From file
- From scanner or camera
- Organization chart , Auto shape , WordArt or chart
edu.uptymez.com
- Depending on the option selected insert or import the object
edu.uptymez.com
Using styles
A style is a predefined set of formats that can be applied to a block of text together at once.
To create a style
- Highlight the text you want to see to create a style
- Apply various formats to the text.
- Click the style box in the formatting bar and type a name for the style
- Press enter to apply the style name
edu.uptymez.com
Note: You can apply an existing style e.g. Headline1, to highlighted text
Generating a table of contents and indexes
A table of contents (TOC) is a list of topics in a document and the pages they appear. It is placed in the first pages of the document. On the other hand, an index is a list of term used in the document and the pages they appear. It is placed at the back pages.
In order to generate a TOC, you must first mark entries by defining style
To generate a table of content
- Turn to the page you want to insert the table of contents
- On the insert menu to reference and then click Index and tables
- Click the table of contents tab
- Set the TOC entriesthen click Ok
edu.uptymez.com
SORTING AND FILTERING
Sorting is a process of arranging items / data in a given order.
SORTING ORDER
a) Ascending order
– Is the process of arranging data / item from the lowest to the highest.
E.g. A-Z OR 0, 1, 2, 3………
b) Descending order
– Is the process of sorting data / items from the highest to the lowest.
E.g.: Z-A OR ………3, 2, 1, 0
SORT THE CONTENTS OF A TABLE
1) In print layout view (Print layout views a view of a document / other object as it will appear when you print it. For example: Items such as header, foot roles, columns and text boxes appear in their actual positions). Move the pointer over the table until the table move handle appear
2) Click the table move handle to select the table that you want to sort
3) Under table tools. On the layout tab , in the data group click sort
4) In t the sort dialog box select the option that you want
SORT A SINGLE COLUMN IN A TABLE
1) Select a column that you want to sort
2) Under table tools, on the layout tab, in the data group click sort,
3) Under my list has, click header row or no header row.
4) Click option
5) Under the sort option , select the sort column check box
6) Click OK
MS – WORD CHART
Define: Is a graphical representation of the table data / items
TYPES OF CHART
i) Bar chart
ii) Pie chart
iii) Line chart
iv) Column chart
v) Area chart
STEPS / PROCEDURES
i) Open Ms – word office
ii) Go to insert tab
iii) Select chart under illustrations group
iv) In a new dialog box type of chart
v) Then click OK
vi) Enter data from the imported Ms – excel window
vii) Then close Ms – excel window
To generate an index you mark the index entries by providing the name of the main entry and the cross – reference in your document.
To generate an index
- Mark the index entries in your document a special XE tag is add to the text.
- Turn to the page you want to insert the index
- On insert menu , point to reference then click Index and Tables
- Click the Index tab
- Set the index properties then click Ok
edu.uptymez.com
Password protecting a document
To protect a document from unauthorized access or modification use a password. Since password is case sensitive avoid mixed case, preferably use lower case.
To create a password.
- On the tools menu, click options and then click the security tab
- Type in a password in the password to open box or the password to modify box
- Set other security options then click Ok.
edu.uptymez.com
Generating merged documents
Mail merging is the process of generating personalized letters, labels or envelopes by merging two files, a main document e.g. Letter envelopes or mailing label with a data sources or addressing book. The three main steps of creating a merged document are:
- Create a main document e.g. A formula letter
- Create or get the data source i.e. the address book
- Marge the two files to a new document , printer or e-mail
edu.uptymez.com
To create a merged documents
- On the Tools menu , point to letters and mailings then click Mail merge Wizard
- From the mail merge panel displayed , select the type of document to work on e.g. letters
- Click Next at the bottom of the panel to proceed
- The will take you through the six steps of creating a merged document
edu.uptymez.com
Note: To create a merged document using another revision of word, read it’s on line help.